My Avatars

Facebook Badge
followers
Popular Posts


Saturday, August 25, 2012
Skull Attitude
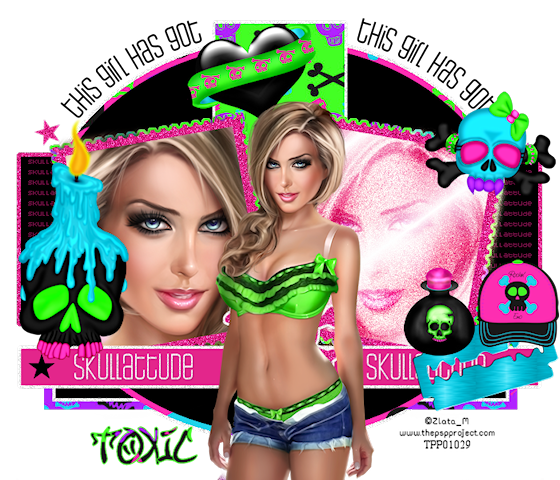
This tutorial is my creation & any resemblemces to others is purely accidental
Written by ToxicTutorialz on 8.25.12 in PSPX2
Any version should work
Written by ToxicTutorialz on 8.25.12 in PSPX2
Any version should work
Do Not Claim as Your own
Link Back to My Blog
Remember to SAVE Often!!!
Link Back to My Blog
Remember to SAVE Often!!!
Version of PSP
Pull your template and tube into psp
Delete the credits and white background on template
Starting with pink rectangle bottom
Pull paper9 into psp
Use magicwand to select your rectangle
C/P your paper as new layer Selections Invert Delete Deselect
Jump up to your pink oval layer
Using magicwand once again Select
Pull paper11 into psp & paste as new layer
Invert Delete Deselect
Jump up to pink top rectangle
Repeat using paper2
Now jump up to GlitterFrameBack Layer
Repeat the above steps using paper5
Open your FrameBack Left & Right layers
Jump back down to Paper glitterbackframe which is raster5 for me
Selections Select All Float Defloat
C/P your closeup tube as new layer
Place your close up the way you like inside left frame
Deselect
Use your eraser to erase any outside overhang on your tube
Duplicate Image Mirror
On duplicate closeup Duplicate
Rename Dup1 & dup2
On dup1 Add a noise 68 Gaussian & Monochrome both checked
On dup2 Change Blendmode to Screen
Now paste your main tube as new layer
Resize to 50% Position in center of template
If you have any layers closed at this point Open them
Bring elements 2,16,18,33,39,&40 into psp
Also bring paper1 into psp
Start pasting your elements as new layers and resize as necessary
Place them where you like best
You can use my tag above for reference if you like
Set your paper as BG on your material palette and light green as your fg
Font set on street soul size 72 Stroke 1 Type out your name
Convert to raster layer & place on bottom left
Finally add your copywrite
Merge all visible and resize all layers to 80%
Save as png

Subscribe to:
Post Comments (Atom)
LinkWithin
About Me

Grab My Blinkies


I CT for


Script Tester 4

My Stalker Hits
Blogs I stalk


0 comments:
Post a Comment