My Avatars


Facebook Badge
followers
Popular Posts


Thursday, May 3, 2012
FlowerChild

This tutorial was written by BethB on 5.3.12 and is my own creation
Any resemblences to other tutorials is purely accidentalAny version should work
Do not Claim as Your Own
Link Back to My BLOG
Tools Needed
PTU KIT
Black&WhiteMade by
DivaDesignz
Poser tube is included wih the kit
Font used
GE TwillScriptPull flower1 into psp
Go to the top and click on Adjust Hue & Sat Colorize
Use these settings H 235 Sat 245 Click ok
Pull Doodle into psp
Copy/Paste as new layer onto canvas
Pull Frame3 into psp
Paste
Resize to 75%
Pull HeartLock into psp
Paste & Rsize to 40%
Place on frame3
Pull Bow2 into psp
Paste
Resize down to 30%
Place on frame above heartlock
Use my tag above for placement
Color as we did before
Pull Poser2 into psp
Paste as new layer
Resize to 75%
Place on left side
Add your copywrite
Set your BG to Black FG Null
Font set on GE Twill Script Size 24
Type out your name
Resize to 55%
Place where you like
Add a Light Pink Gradient Glow
Merge all Visible
Save
Rockin Emo Girl

This Tutorialw as written by BethB on 4.3.12 and is my own creation
Any similarites to other tutorials is purely accidentalWritten in PSPX2
Any version should workDo Not Claim as Your Own
Link Back to My Blog
Tools Needed
PTU Kit
EmoGirls RuleMade by
BrokenSkyDesign
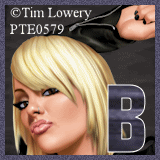
Tube by
CelinArtat SATCYou must first purchase a license before using any tube
Font used
GE TwillScriptLet's get started
Open a 700 x 700 300dpi blank canavas
Set your FG to Paper7,Width 30
Draw out a large rectangle
Use your selection tool
Start from inside top corner & draw out a long rectangle about half way over
Use my tag for a guide
Drag paper 12 into psp
Add new layer above frame layer
C/P paper12 as new layer
Selections Invert Delete Select None
Move paper layer below your frame layer
Repeat the other side using Paper8
Now open a new 700 x 500 blank canvas
Now copy/paste each layer over to your new canavas
Resize each layer to 70%
Delete the original working image
Drag BSD_28 into psp
Paste
Position on left side at bottom
Drag BSD_27 into psp
Paste
Resize to 65%
Position at bottom corner of frame
C/P your tube as new layer
Place on right side
You may need to resize
Drag BSD_25 into psp
Paste
Place in center Resize to 80%
Drag BSD_23 into psp
Paste & Resize to 55%
Position on guitar
use eraser to erase bits of the chain
We want it to look as if its wrapped around the guitar
Drag BSD_10 into psp
Paste and Resize down to 40%
Place at bottom on right side
Move this layer below your guitar layer on layer palette
Drag BSD_21 into psp
Paste
Move this layer below your frame layer
Drag BSD-22 & BSD_42 INTO PSP
Paste BSD_22 as new layer
Resize down to 40%
Position in frame
Now Paste BSD_49 as new layer
Place on left side inside frame
Add other elements you may like
Add your copywrite
Set your BG to paper4 FG WHITE
Font set on GE Twill Script Size 28 Stroke2
Type out your name
Convert to raster
Resize to 55%
Place where you like
Merge all visible
Resize if you like to 75% all layers checked
Save as png

Subscribe to:
Comments (Atom)
LinkWithin
About Me

Grab My Blinkies


I CT for


Script Tester 4

My Stalker Hits
Blogs I stalk