My Avatars


Facebook Badge

followers

Popular Posts


Monday, September 17, 2012
BOO
This tutorial is my creation & any resemblemces to others is purely accidental
Written by ToxicTutorialz on 9.17.12 in PSPX2
Any PSP version should work
Do Not Claim as Your own
Link Back to My Blog
Remember to SAVE Often!!!
PTU Kit-SpookyHallow by DarlinsCreations
Purchase it Here
No outside tubes were used for this tutorial
Font BlackFlag
AnimationShop=AS
Plugin-EC5/Impact/Glass
Let's Begin with bringin element20 into psp
Resize to 70% all layers unticked
Now resize the frame once more to 112%
Move frame over to the right & toward the top just a bit
Bring element 38 into psp and paste as new layer
Resize to 75% & place on bottom left side of frame
Bring element 31 into psp and paste as new layer
Place in center at bottom and resize to 55%
Jump onto your frame layer
Add new layer and move below frame layer
Jump back onto frame layer and use magicwand to select center
Selections Modify Expand by 5 Floodfill with a color of your choice
I used the color #8c58da Deselect
Apply the plugin EC5 Impact/Glass with the settings listed below
Basic Tab- 145.90, 47.90 Rest on default
Bring element 7 into psp and resize to 15%
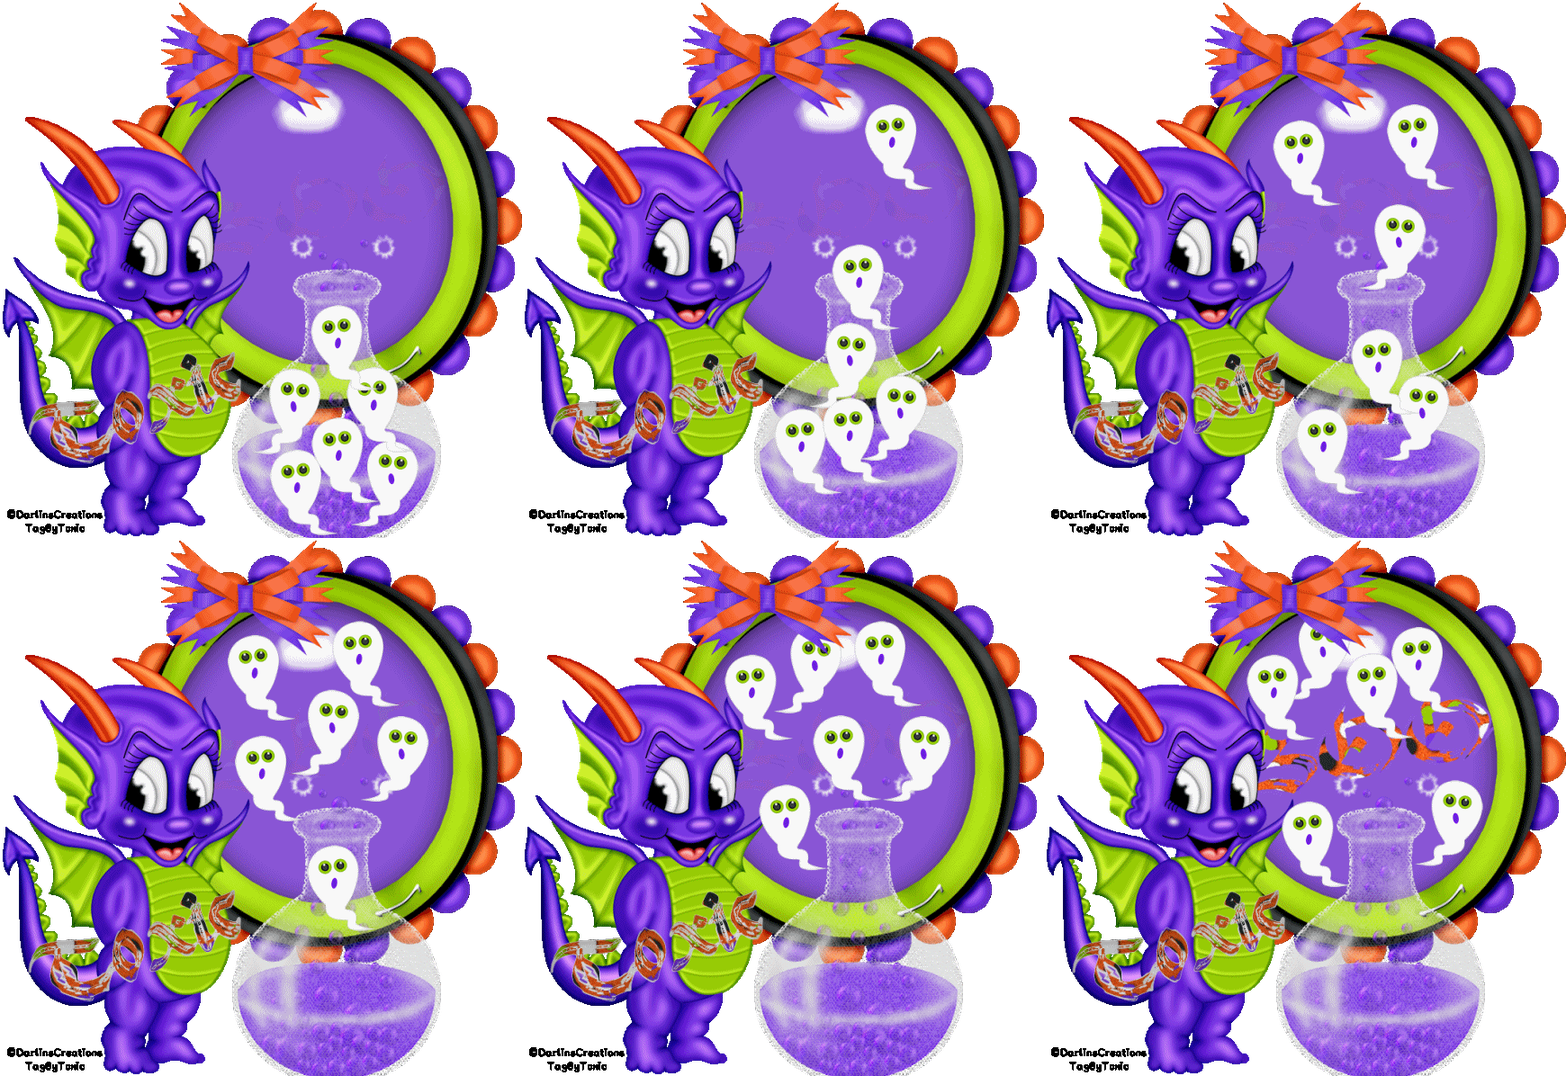
Place the ghost on bottom of the potionbottle
Duplicate as seen in my tag above
Bring paper 6 into psp and set it as your bg on material palette
Set #8c58da as your fg
Set your font on Black Flag size 20 Stroke 3
Type out the word BOO Convert to raster layer
Place inside your bubble frame Move opacity down to 7
Add your name
Add your copywrite
Add other elements you may want at this point
Edit Copymerged
Open Animationshop Paste as New Animation
Back to PSP
Move your top ghost toward the top of the potionbottle just a bit
Now move the rest of the ghosts up just a bit
Edit Copymerged Paste into Animationshop after currentframe
Back to psp
Repeat the above steps again
Edit Copymerged Paste into AS after currentframe
Back to PSP
Repeat the above steps again til you have all ghosts out of the bottle
Make sure you paste into AS each time you bring the ghosts out
Once you have your ghosts layers in AS go back to PSP
Jump onto your wordart Boo Layer
Move the opacity to 30
Edit CopyMerged Paste into AS after currentframe
Back to psp
Repeat the opacity but change to 57 this time
Paste into AS after currentframe
Back to psp
Repeat once more moving opacity all the way to 100
Paste into AS after currentframe
You should have a total of 14 frames in AS
Edit Select All Animation Frame Properties
Set speed to 75
View Animation and Save

Wednesday, September 12, 2012
BlackWidow

This tutorial is my creation & any resemblemces to others is purely accidental
Written by ToxicTutorialz on 9.12.12 in PSPX2
Written by ToxicTutorialz on 9.12.12 in PSPX2
Any PSP version should work
Do Not Claim as Your own
Link Back to My Blog
Remember to SAVE Often!!!
Link Back to My Blog
Remember to SAVE Often!!!
No outside tubes were used for this tutorial
Font BlackFlag
dafont.com
dafont.com
AnimationShop=AS
Plugin
VM InstantArt/Fog
Start with a 600 x 600 blank canvas
Set your FG to paper7 from kit BG on Null
Preset shape on rectangle Width 3 Create as vector and antialias both ticked
Draw out a long rectangle Grab control arm in center and push up
Convert to raster layer
Use magicwand to select center of frame
Pull poser 6 into psp
C/P as new layer Resize to 55% Selections Invert Delete
Drag poser layer below frame layer
Pull Ele33 into psp
Paste as new layer & resize to 50% Place on top left side on frame
Pull Ele10 into psp & paste as new layer
Move spider layer below poser & frame layers
Pull Elements 29 & 36 into psp
C/P element 29 into psp & resize to 50%
Place on bottom left side on frame
Now paste Ele36 as new layer Resize to 40%
Place on top left side on spiderweb
Move pumpkin layer below spiderweb layer
Pull Ele3 into psp
Resize to 35% Place on bottom right corner of frame
Pull Poser 3 into psp and resize to 40%
Place over on right side
Pull 1 more element of choice into psp and paste
Place where you like best
I used Element1
Set Paper7 as your FG BG on #c00000
Font on BlackFlag Size 20 Stroke1
Type out your name Convert to Raster layer
Selections Select All Float Defloat Selections Modify Expand by 3
Magicwand to select your frame
Jump to YOUR CLOSEUP Poser
Add new layer
Effects Plugins VM InstantArt/Fog with the settings below
153,158,78,218,128,6 Hit ok
Deselect
Edit Copymerged Paste as new animation in AS
Back to psp
Hit undo twice
Repeat plugin with these settings
Just change the frequency to 116
Deselect
Edit copymerged back to AS & Paste after currentframe
Back to psp
Hit undo twice
Repeat once more with these settings
153,158,176,172,128,6 Hit ok
Deselect
In animationshop
Edit Select All Animation Frame Properties Speed to 60
View Animation & Save
Set your FG to paper7 from kit BG on Null
Preset shape on rectangle Width 3 Create as vector and antialias both ticked
Draw out a long rectangle Grab control arm in center and push up
Convert to raster layer
Use magicwand to select center of frame
Pull poser 6 into psp
C/P as new layer Resize to 55% Selections Invert Delete
Drag poser layer below frame layer
Pull Ele33 into psp
Paste as new layer & resize to 50% Place on top left side on frame
Pull Ele10 into psp & paste as new layer
Move spider layer below poser & frame layers
Pull Elements 29 & 36 into psp
C/P element 29 into psp & resize to 50%
Place on bottom left side on frame
Now paste Ele36 as new layer Resize to 40%
Place on top left side on spiderweb
Move pumpkin layer below spiderweb layer
Pull Ele3 into psp
Resize to 35% Place on bottom right corner of frame
Pull Poser 3 into psp and resize to 40%
Place over on right side
Pull 1 more element of choice into psp and paste
Place where you like best
I used Element1
Set Paper7 as your FG BG on #c00000
Font on BlackFlag Size 20 Stroke1
Type out your name Convert to Raster layer
Selections Select All Float Defloat Selections Modify Expand by 3
Magicwand to select your frame
Jump to YOUR CLOSEUP Poser
Add new layer
Effects Plugins VM InstantArt/Fog with the settings below
153,158,78,218,128,6 Hit ok
Deselect
Edit Copymerged Paste as new animation in AS
Back to psp
Hit undo twice
Repeat plugin with these settings
Just change the frequency to 116
Deselect
Edit copymerged back to AS & Paste after currentframe
Back to psp
Hit undo twice
Repeat once more with these settings
153,158,176,172,128,6 Hit ok
Deselect
In animationshop
Edit Select All Animation Frame Properties Speed to 60
View Animation & Save
Subscribe to:
Posts (Atom)
LinkWithin

About Me

Grab My Blinkies


I CT for


Script Tester 4

My Stalker Hits
Blogs I stalk