My Avatars

Facebook Badge
followers
Popular Posts


Monday, February 13, 2012
Blow Me
This tutorial was made for an awesome Designer (thanks freek)
for using my idea for this kit,I love it
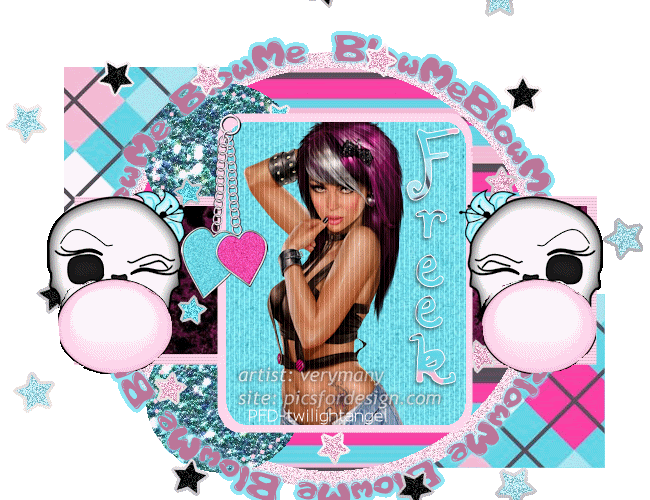
This tutorial was written by BethB on 2.13.12 & is my own creation.
Any resemblance to other tutorials is purely accidental.
This tutorial involves animation.
♥
♥
You will need
PSPX2
Tube used in this tutorial is by verymany from PFD
BlowMe Template by SummerDreamsCreations
BlowMe PTU Kit by FreeksCreations
AnimationShop
Font used Lollipop-dafont.com
Plugin-PhotoEffex/Scanlines
♥
♥
Delete watermark
Close off layer but bottom 2 layers
On bottom layer
Selections-Select All-Float-Defloat
Pull paper6 into psp
C/P as new layer.Selections-Invert-Delete
Deselect
Repeat for raster 2 layer using same paper
Delete original layers
Open your circle layers
Repeat the steps above for the top circle layer using Paper8
Deelte original layer
Repeat the above steps for all layers using different papers of choice
You can use my tag above for a guide
On the top layer
Selections-Select All-Float-Defloat
Paste tube as new layer,You may need to resize
I resized to 50%. Selections-Invert-Delete
Deselect
On the tube layer-Merge down
Effects/Plugins-PhotoEffex/Scanlines
Wih these settings
Width 4,Spacing 1,Dark Band 20,Light Nonband 9,Noise 7,Vertical Tog ticked,Click OK
Pull E38 into psp.Paste as new layer. Move this layer below your tube and top two frame layers
Pull E28 into psp.Paste as new layer.Resize to 45%. Place on left side, on frame.
Pull E24 into psp.Paste as new layer.Resize to 55%.Place on left side of frame.
Duplicate.Image.Mirror
Add your copywrite
Pull Paper6 into psp.Set as your BG,FG White,Font set to Lollipop,Size 28
Type out your name 1 letter at a time..Use my tag above for guidance
Convert to Raster
Add a small dropshadow
On the E24 Layers,Merge down
Use your selectiontool,set on freehand
Make a selection around one of the circles
Paste as new image in psp.
Back on your circle hit delete.Repeat for right side also.
Deselect
Now paste the circle bk on your working image. Duplicate.Image.Mirror
♥
Edit-Copymerged-Paste into Animationshop as New Animation
Back to PSP
Making sure you are on left side circle layer
Image-Resize to 115%.
Line it bk up with circle
Edit-Copymerged-Paste into Animationshop after currentframe
Back to psp
Repeat for right side circle
Edit-Copymerged-Paste into Animationshop after currentframe
Back to PSP
rEPEAT FOR LEFT CIRCLE AGAIN BUT THIS TIME RESIZE TO 130%
Edit-Copymerged-Paste into animationshop after currentframe
Back to psp
Repeat again for right side except this time resize to 135%
Edit-Copymerged-Paste into Animationshop after currentframe
In Animationshop
Edit-Select All-View Animation
Save as gif

Subscribe to:
Post Comments (Atom)
LinkWithin
About Me

Grab My Blinkies


I CT for


Script Tester 4

My Stalker Hits
Blogs I stalk


0 comments:
Post a Comment