My Avatars


Facebook Badge

followers

Popular Posts


Tuesday, September 4, 2012
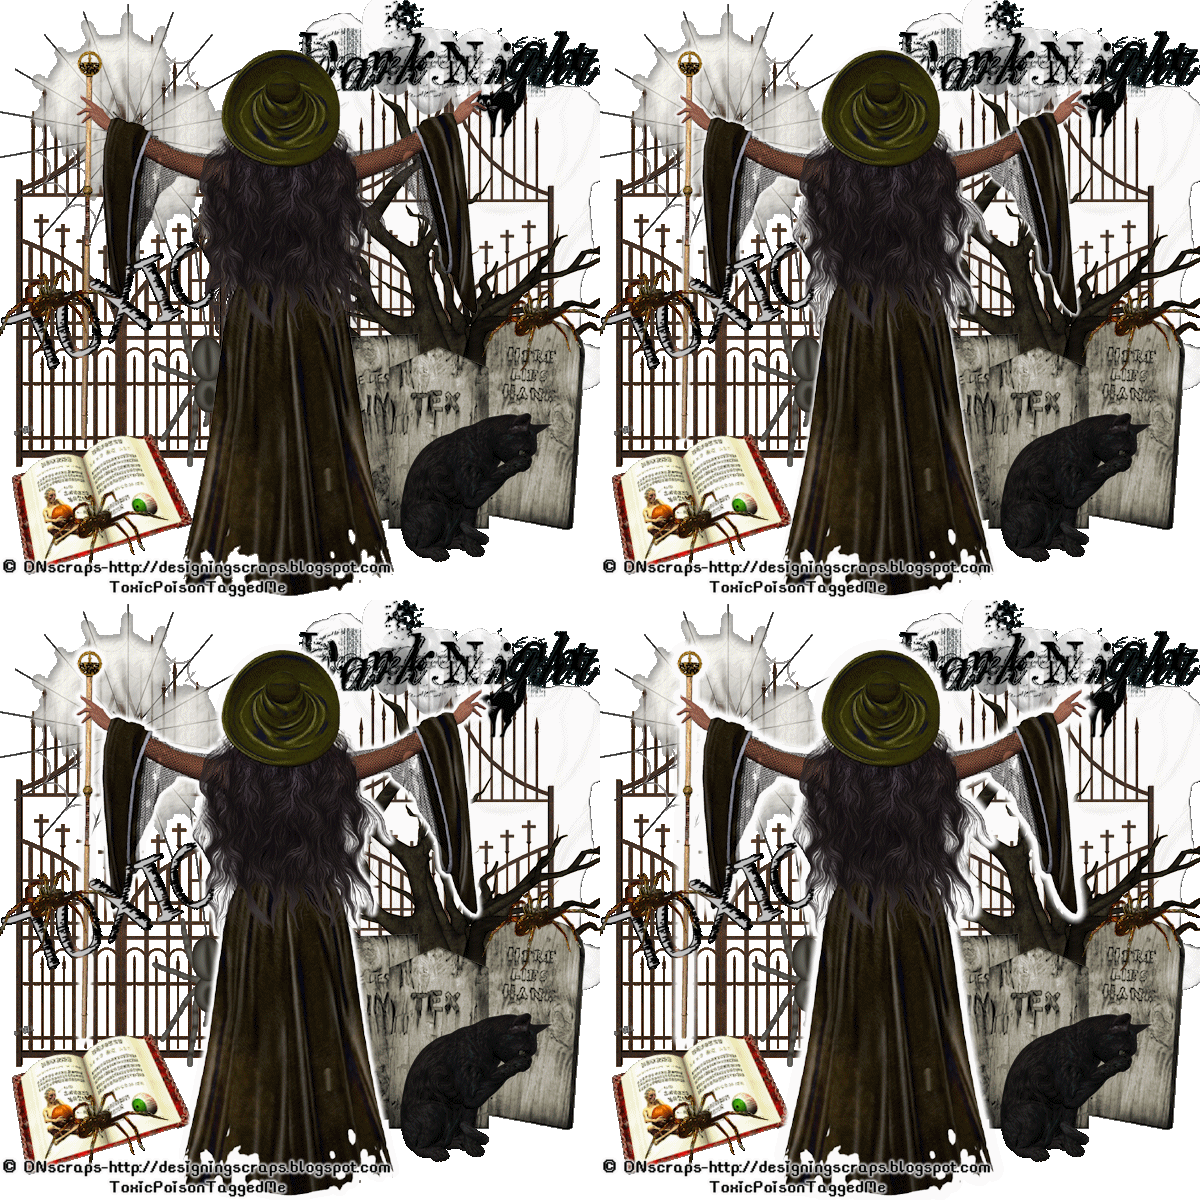
Graveyard Witch
This tutorial is my creation & any resemblemces to others is purely accidental
Written by ToxicTutorialz on 9.4.12 in PSPX2
Any version should work
Do Not Claim as Your own
Link Back to My Blog
Remember to SAVE Often!!!
Version of PSP
Written by ToxicTutorialz on 9.4.12 in PSPX2
Any version should work
Do Not Claim as Your own
Link Back to My Blog
Remember to SAVE Often!!!
Version of PSP
AnimationShop
Plugin EC4/Gradientglow
PTU Kit -SpiderDarkNight
by Dnscraps
by Dnscraps
No outside tubes used
Font-What A Mess
fontspace.com
fontspace.com
Copy/Paste=C/P
Animationshop=AS
Animationshop=AS
Open a 600 x 600 blank image
Bring gate and spider into psp
C/P gate as new layer onto image
Resize to 65% Place on the left side of image and duplicate Mirror
C/P the spider as new layer Resize to 55%
Place on left side at the top behnd gate
Bring ghost into psp
C/P as new layer Resize to 60% Plac eon right side behind gate
Move the opacity down to 81% on the ghost
Bring tree & tombstone into psp
C/P the tree as new layer Place on lower right side below gate-Resize if necessary
Now do the same thing for the tombstone but place in front of the tree-Resize if necessary
Bring book,cat2,spider,wordart, & witch into psp and minize all but book and spider
C/P book as new layer Resize to 45% Place at bottom on left side against gate
Now paste the spider and resize to 35% Place on edge of book
Duplicate the spider and place on tombstone
Paste the witch as new layer
Resize to 65% Position in center of canvas
Now paste your cat as new layer Resize to 45% Place on right side beside witch
Finally paste the wordart Resize and place on top right side of image
Add your copywrite
Pull paper of choice into psp I used paper15
Set as your FG on material palette BG as #c0c0c0
Font set on What A Mess Size 24 B=Bold Stroke 1
Type out your name Convert to raster layer
Open Animationshop at this time
Edit CopyMerged Paste into AS as New Animations
Back to PSP
Jump onto your witch layer
Effects Plugins EC4/GradientGlow
Apply with these settings
Basic Tab-Glow 4.75, Check DrawOnly Outside Selection
Color Tab- White Click ok
Edit CopyMerged Paste into AS after current frame
Back to PSP
Apply GradientGlow but this time on Basic Tab hit the top arrow once
Click Ok
Edit Copymerged Paste into AS after current frame
Back to psp
Repeat GradientGlow once more but this time change glow to 6.75
Click ok
Edit Copymerged Paste into AS after current frame
In animationshop you should have 4 frames
Edit Select All Animation FrameProperties Set speed to 40
View Animation and save as gif
Bring gate and spider into psp
C/P gate as new layer onto image
Resize to 65% Place on the left side of image and duplicate Mirror
C/P the spider as new layer Resize to 55%
Place on left side at the top behnd gate
Bring ghost into psp
C/P as new layer Resize to 60% Plac eon right side behind gate
Move the opacity down to 81% on the ghost
Bring tree & tombstone into psp
C/P the tree as new layer Place on lower right side below gate-Resize if necessary
Now do the same thing for the tombstone but place in front of the tree-Resize if necessary
Bring book,cat2,spider,wordart, & witch into psp and minize all but book and spider
C/P book as new layer Resize to 45% Place at bottom on left side against gate
Now paste the spider and resize to 35% Place on edge of book
Duplicate the spider and place on tombstone
Paste the witch as new layer
Resize to 65% Position in center of canvas
Now paste your cat as new layer Resize to 45% Place on right side beside witch
Finally paste the wordart Resize and place on top right side of image
Add your copywrite
Pull paper of choice into psp I used paper15
Set as your FG on material palette BG as #c0c0c0
Font set on What A Mess Size 24 B=Bold Stroke 1
Type out your name Convert to raster layer
Open Animationshop at this time
Edit CopyMerged Paste into AS as New Animations
Back to PSP
Jump onto your witch layer
Effects Plugins EC4/GradientGlow
Apply with these settings
Basic Tab-Glow 4.75, Check DrawOnly Outside Selection
Color Tab- White Click ok
Edit CopyMerged Paste into AS after current frame
Back to PSP
Apply GradientGlow but this time on Basic Tab hit the top arrow once
Click Ok
Edit Copymerged Paste into AS after current frame
Back to psp
Repeat GradientGlow once more but this time change glow to 6.75
Click ok
Edit Copymerged Paste into AS after current frame
In animationshop you should have 4 frames
Edit Select All Animation FrameProperties Set speed to 40
View Animation and save as gif
Monday, September 3, 2012
Toil & Trouble

This tutorial is my creation & any resemblemces to others is purely accidental
Written by ToxicTutorialz on 9.3.12 in PSPX2
Written by ToxicTutorialz on 9.3.12 in PSPX2
Any version should work
Do Not Claim as Your own
Link Back to My Blog
Do Not Claim as Your own
Link Back to My Blog
Remember to SAVE Often!!!
Version of PSP
Version of PSP
PTU Tube-WitchMe
By ArthurCrowe
By ArthurCrowe
Font -NightMare5
fontspace.com
fontspace.com
Mask-Sparkuchymask1
Download CreativeMisfits
Download CreativeMisfits
Open a 600 x 600 blank image
Bring the following elements into psp
Poison, Mist, broom, cauldron2, flowerbranch, spider, skull1 & 2,headstones,
C/P your headstones as new layers, Resize as necessary
Position the way you like on your image or use mine above for reference
C/P your tube as new layer
Place at bottom in center of headstones
C/P the spider as new layer
Resize to 45% Place on one of your headstones as in my tag above
Now paste your skulls as new layer Place around the bottom of headstones
C/P the branch Resize to 55% Place behind your tube
Now paste your remaining elements and resize as necessary
Position the cauldron in front of your tube and the broom beside your cauldron
Paste the poison and place behind your skulls
Paste the mist as new layer
Resize to 60% Place behind tube,cauldron,broom,poison and skulls
I also used the cat element
Resize to 45% Place on one of the headstones
Duplicate twice Place the remaining cats where you like best
Add your copywrite
Pull paper4 into psp and paste as new layer onto image
Move down to bottom
Apply your mask
Right click on mask layer in layer palette and merge group
Pick 2 colors from tube and set as your BG & FG
Set font on Nightmare 5 Size 48 B=bold Stroke2
Type out your name and convert to raster layer
Place where your like best..
Merge all visible and save as png
Bring the following elements into psp
Poison, Mist, broom, cauldron2, flowerbranch, spider, skull1 & 2,headstones,
C/P your headstones as new layers, Resize as necessary
Position the way you like on your image or use mine above for reference
C/P your tube as new layer
Place at bottom in center of headstones
C/P the spider as new layer
Resize to 45% Place on one of your headstones as in my tag above
Now paste your skulls as new layer Place around the bottom of headstones
C/P the branch Resize to 55% Place behind your tube
Now paste your remaining elements and resize as necessary
Position the cauldron in front of your tube and the broom beside your cauldron
Paste the poison and place behind your skulls
Paste the mist as new layer
Resize to 60% Place behind tube,cauldron,broom,poison and skulls
I also used the cat element
Resize to 45% Place on one of the headstones
Duplicate twice Place the remaining cats where you like best
Add your copywrite
Pull paper4 into psp and paste as new layer onto image
Move down to bottom
Apply your mask
Right click on mask layer in layer palette and merge group
Pick 2 colors from tube and set as your BG & FG
Set font on Nightmare 5 Size 48 B=bold Stroke2
Type out your name and convert to raster layer
Place where your like best..
Merge all visible and save as png
Subscribe to:
Posts (Atom)
LinkWithin

About Me

Grab My Blinkies


I CT for


Script Tester 4

My Stalker Hits
Blogs I stalk