Blog Archive
- Nov 05 (1)
- Nov 03 (1)
- Nov 02 (1)
- Oct 31 (1)
- Oct 30 (1)
- Oct 25 (1)
- Oct 21 (1)
- Oct 17 (1)
- Oct 15 (1)
- Oct 14 (1)
- Oct 13 (3)
- Oct 12 (1)
- Oct 11 (1)
- Oct 10 (1)
- Oct 03 (1)
- Sep 25 (1)
- Sep 24 (1)
- Sep 23 (1)
- Sep 22 (2)
- Sep 19 (1)
- Sep 18 (2)
- Sep 17 (1)
- Sep 12 (1)
- Sep 10 (2)
- Sep 09 (1)
- Sep 07 (2)
- Sep 05 (1)
- Sep 04 (1)
- Sep 03 (2)
- Sep 02 (1)
- Sep 01 (1)
- Aug 29 (1)
- Aug 25 (1)
- Aug 23 (1)
- Aug 20 (1)
- Aug 14 (1)
- Aug 10 (1)
- Aug 08 (2)
- Aug 05 (1)
- Aug 04 (3)
- Aug 02 (1)
- Jul 24 (1)
- Jul 22 (1)
- Jul 21 (1)
- Jul 08 (1)
- Jul 05 (1)
- Jun 13 (1)
- Jun 11 (1)
- Jun 08 (1)
- Jun 05 (1)
- Jun 02 (1)
- May 18 (1)
- May 17 (1)
- May 15 (1)
- May 12 (2)
- May 07 (2)
- May 06 (1)
- May 04 (1)
- May 03 (2)
- Apr 29 (1)
- Apr 26 (1)
- Apr 25 (2)
- Apr 22 (2)
- Apr 14 (3)
- Apr 10 (1)
- Apr 09 (1)
- Apr 08 (1)
- Apr 06 (1)
- Apr 05 (1)
- Apr 04 (1)
- Apr 01 (2)
- Mar 31 (2)
- Mar 30 (1)
- Mar 28 (1)
- Mar 24 (2)
- Mar 23 (3)
- Mar 22 (1)
- Mar 19 (1)
- Mar 17 (1)
- Mar 12 (1)
- Mar 11 (1)
- Mar 10 (4)
- Mar 09 (1)
- Mar 08 (1)
- Mar 05 (2)
- Mar 04 (1)
- Mar 03 (2)
- Mar 02 (1)
- Feb 29 (2)
- Feb 28 (1)
- Feb 21 (2)
- Feb 19 (2)
- Feb 17 (1)
- Feb 15 (1)
- Feb 13 (1)
- Feb 12 (2)
- Feb 11 (2)
- Feb 10 (2)
- Feb 09 (3)
- Feb 05 (2)
- Feb 04 (1)
- Feb 01 (5)
- Jan 31 (1)
Facebook Badge
followers
Powered by Blogger.
Popular Posts
Wednesday, August 8, 2012
Timeless
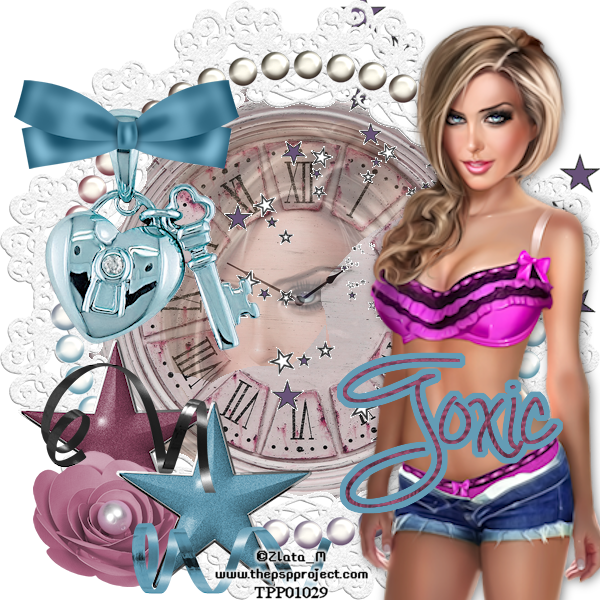
This tutorial is my creation & any resemblemces to others is purely accidental
Written by ToxicTutorialz on 8.8.12 in PSPX2
Any version should work
Do Not Claim as Your own
Link Back to My Blog
Remember to SAVE Often!!!
Version of PSP
PTU Kit
TattoosAndLace
PTU Tube
Zlata_M
Purchase at ThePSPProject
Font of choice
Open 600 x 600 blank image
Pull frame2 and starspiral 1 into psp
Paste the starspiral as new layer onto image
Paste frame2 as new layer
Now pull clock into psp
Use magicwand to select center of frame
C/P the clock as new layer and invert
Delete on keyboard DONT DESELECT YET
Move clock layer below frame layer
Pull up your tube
C/P the closeup tube as new layer
Selections Invert Delete
Move opacity layer on tube to 42
Now move this layer below frame layer but above clock layer
Now add your main tube as new layer and place on right side
Resize if necessary
Pull heartandkey into psp
Paste as new layer
Resize to 60% Place on frame on left side
Pull bow of choice into psp
I used bow2
Paste & resize to 55%
Position at the top of the heart n key
Bring star2, & 3 into psp
C/P them onto image
Resize to 50%
Place on bottom left side
Now bring ribbon2 & 3 into psp
Paste them as new layers
Resize to 40% Place them on your stars
Bring flower2 into psp
Paste
Resize to 35%
Place at bottom near your stars
Pull paper3 into psp
Set as your BG on your material palette
FG Null
Font set on whatever you like
I used Simply Glamorous Size 28 B
Type out your name
Convert to raster and place where you like best
Selections Modify Expand by 6
Add new layer
Floodfill with a color from tube
Add your copywrite & save as png
Labels:
PTU.Tuts
Subscribe to:
Post Comments (Atom)
About Me
♥My T.O.U♥
♥Tutorial T.O.U♥
The tutorials are from my own creation & what you make from them are yours but please DO NOT use my tutorials for monetary gain or to make money from.
I love writing tutorials to guide and teach you.
Please DO NOT hotlink anything from this blog.
You may share my tutorials in your groups with my permission. I am allowed to join any group that my tutorials are being shared with.
Tuts wrote for Nov
- DevilishDezines-
- Scraps Dimensions
- Addictive Pleasures-
My Stalker Hits
Labels
PTU.Tuts
(112)
FTU.Tuts
(10)
SneakPeeks
(3)
Templates
(3)
FTU Elements
(2)
News
(2)
Tag Showoffs
(2)
Blinkie Tut
(1)
BlogTrains
(1)
FTU
(1)
FTU Previews
(1)
Moving tutorials
(1)
New Blog Layout
(1)
Tutorial Previews
(1)
ftu tags
(1)


0 comments:
Post a Comment