My Avatars


Facebook Badge

followers

Popular Posts


Sunday, September 23, 2012
Demons n the Night
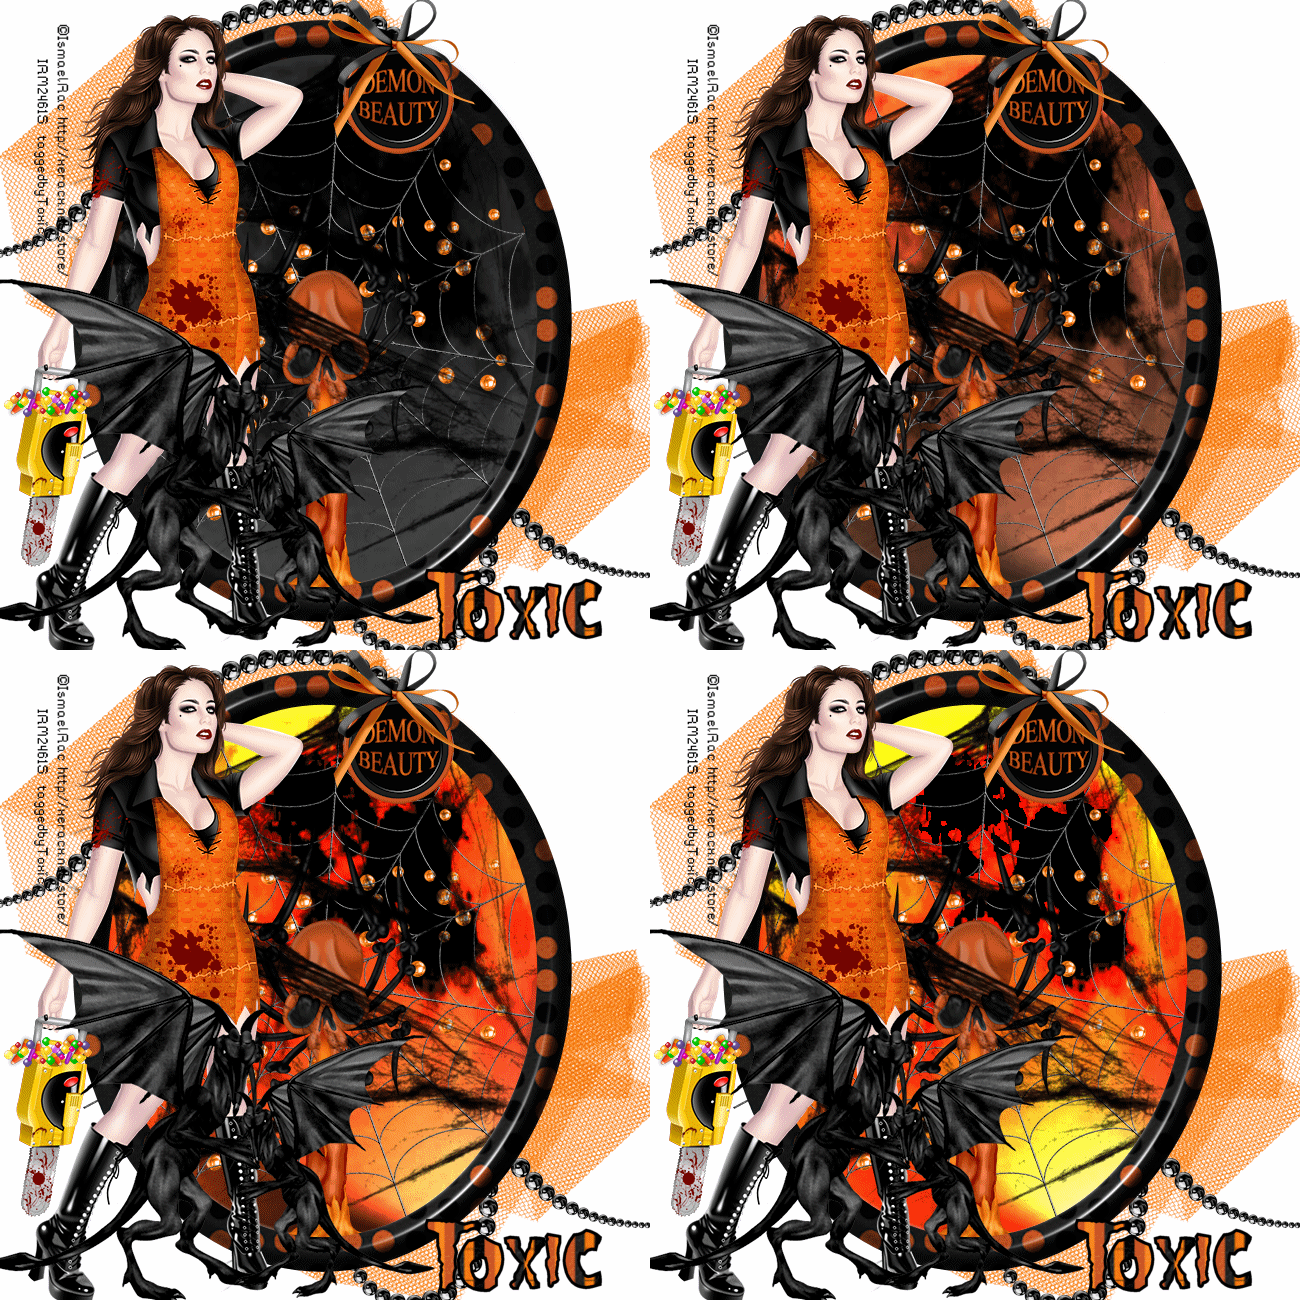
This tutorial is my creation & any resemblemces to others is purely accidental
Written by ToxicTutorialz on 9.23.12 in PSPX2
Any PSP version should work
Do Not Claim as Your own
Link Back to My Blog
Remember to SAVE Often!!!
PTU Kit used DemonBeauty by AddictivePleasures
PTU Tube used Devious by Ismael Rac /You may buy it here
Font used Misfits / download at fontspace.com
AnimationShop
PTU Tube used Devious by Ismael Rac /You may buy it here
Font used Misfits / download at fontspace.com
AnimationShop
Open a new image 650 x 650 transparent
Preset shape set on ellipse width36 FG on paper9 BG on Null
Draw out a large oval
Apply a bevelboss of choice
Pull web into psp
Copy/Paste as new layer Place inside frame toward the top
Duplicate web Image Mirror flip
Grab eraser size 25 and erase any overhang outside of frame on both web layers
Move weblayers below your frame layer
Pull moon into psp and paste as new layer inside frame
Use your picktool to stetch out from top to bottom and from left to right
Move below frame and web layers
Pull spiderweb into psp and paste inside frame
Make sure this layer is above moon but below webs and frame layers
Pull netting into psp and paste as new layer
Move netting layer below all layers and place in top left corner
Duplicate Image Flip and place in lower right corner
Pull beads2 into psp
C/P inside frame as new layer
Pull pearls into psp
Copy & Paste as new layer Place in top left corner
Move this layer below moon layer but above netting layers
Duplicate Image Mirror Flip and then flip again Position in bottom right corner
C&P your tube as new layer Position on the LEFT side of frame
Pull gargoyle into psp and paste as new layer on bottom right side
We want it to make it look as if he is grabbin your tube's leg
Place between her legs
Resize to 55% and duplicate Place on the outside of her right leg
Pull candle, bow4 and button into psp
C&P the button as new layer and resize to 45%
Place in the upper right side on frame
Repeat for the bow and place on button
Paste the candle as new layer and place at the bottom on right side
Add your copywrite
Pull paper11 into psp and set as BG FG on Black
Font on Misfits Size 24 Stroke3
Type out your name and convert to raster layer
Place on the bottom right side
Jump down to the very bottom layer and floodfill with white
Now comes the fun part
Open animation shop
Edit Copymerged and Paste into Animation Shop as New Animation
Back to PSP
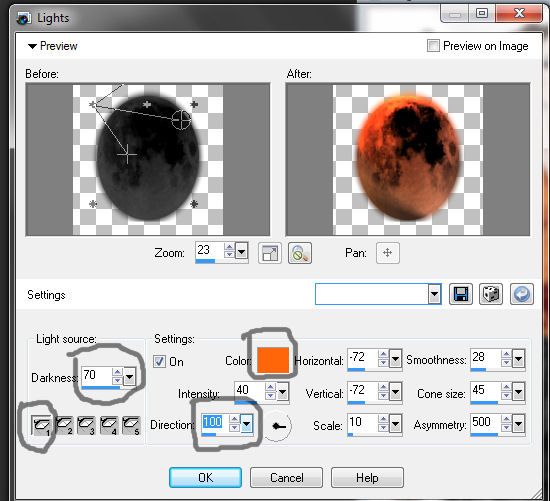
Jump up onto your moon layer and apply
Effects Illumination Lights and apply the settings shown below
Preset shape set on ellipse width36 FG on paper9 BG on Null
Draw out a large oval
Apply a bevelboss of choice
Pull web into psp
Copy/Paste as new layer Place inside frame toward the top
Duplicate web Image Mirror flip
Grab eraser size 25 and erase any overhang outside of frame on both web layers
Move weblayers below your frame layer
Pull moon into psp and paste as new layer inside frame
Use your picktool to stetch out from top to bottom and from left to right
Move below frame and web layers
Pull spiderweb into psp and paste inside frame
Make sure this layer is above moon but below webs and frame layers
Pull netting into psp and paste as new layer
Move netting layer below all layers and place in top left corner
Duplicate Image Flip and place in lower right corner
Pull beads2 into psp
C/P inside frame as new layer
Pull pearls into psp
Copy & Paste as new layer Place in top left corner
Move this layer below moon layer but above netting layers
Duplicate Image Mirror Flip and then flip again Position in bottom right corner
C&P your tube as new layer Position on the LEFT side of frame
Pull gargoyle into psp and paste as new layer on bottom right side
We want it to make it look as if he is grabbin your tube's leg
Place between her legs
Resize to 55% and duplicate Place on the outside of her right leg
Pull candle, bow4 and button into psp
C&P the button as new layer and resize to 45%
Place in the upper right side on frame
Repeat for the bow and place on button
Paste the candle as new layer and place at the bottom on right side
Add your copywrite
Pull paper11 into psp and set as BG FG on Black
Font on Misfits Size 24 Stroke3
Type out your name and convert to raster layer
Place on the bottom right side
Jump down to the very bottom layer and floodfill with white
Now comes the fun part
Open animation shop
Edit Copymerged and Paste into Animation Shop as New Animation
Back to PSP
Jump up onto your moon layer and apply
Effects Illumination Lights and apply the settings shown below
insert image1
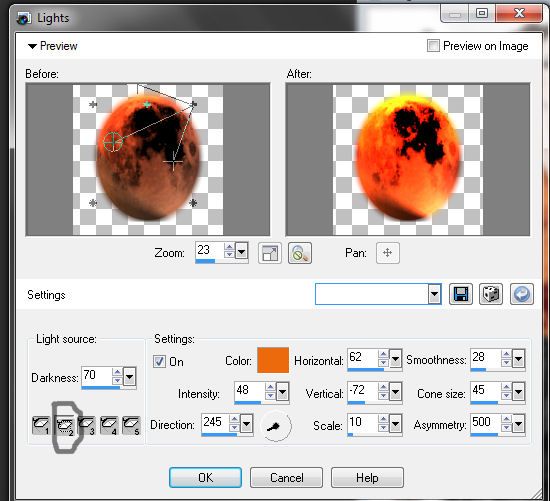
Edit CopyMerged Paste into Animation Shop after CurrentFrame
Back to PSP
Apply same effect as in image 2 below
Back to PSP
Apply same effect as in image 2 below
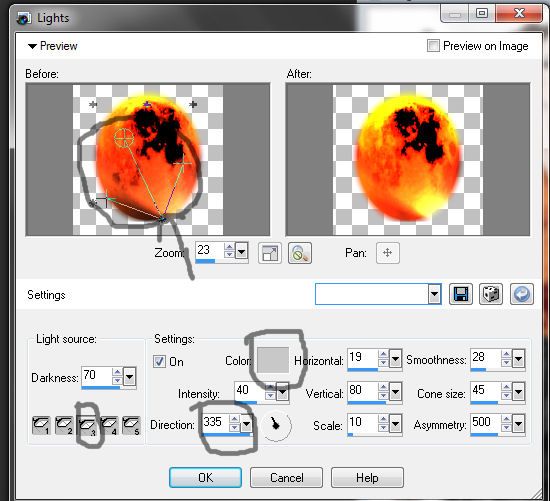
Edit CopyMerged Paste into Animation Shop after Currentframe
Back to PSP
Repeat same effect as seen in below image3
Back to PSP
Repeat same effect as seen in below image3
Paste into Animation Shop as before
Now in animationshop Edit Select All Animation Frame Properties
Set speed to 40 View Animation and Save
Now in animationshop Edit Select All Animation Frame Properties
Set speed to 40 View Animation and Save
Saturday, September 22, 2012
Haunted
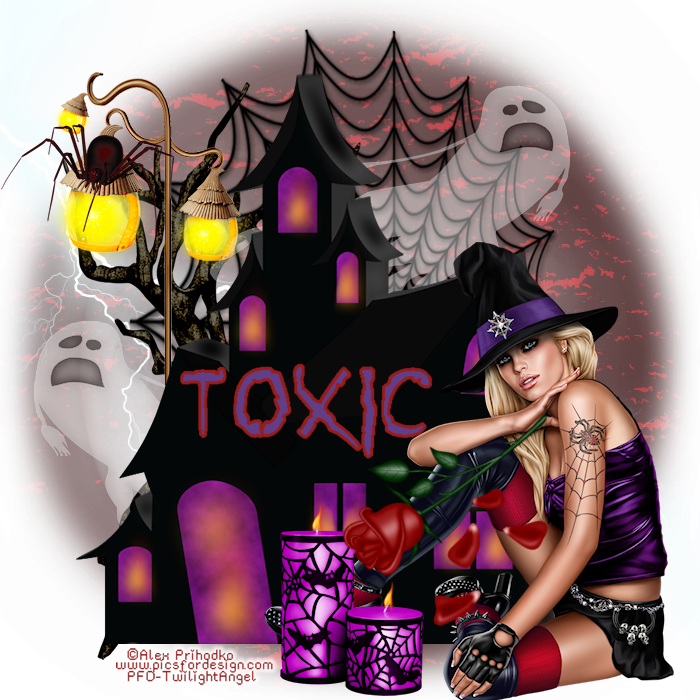
This tutorial is my creation & any resemblemces to others is purely accidental
Written by ToxicTutorialz on 9.22.12 in PSPX2
Any PSP version should work
Written by ToxicTutorialz on 9.22.12 in PSPX2
Any PSP version should work
Do Not Claim as Your own
Link Back to My Blog
Remember to SAVE Often!!!
Link Back to My Blog
Remember to SAVE Often!!!
Mask by LadyT-2nq5ftx
Grab it at CreativeMisfits Creations
Grab it at CreativeMisfits Creations
Font used Sin of the Innocent
Grab it at fontspace.com
Grab it at fontspace.com
Let's begin with a 700 x 700 blank image
Pull paper 3 into psp
Copy/Paste as new layer onto image
Adjust Hue & Sat Colorize H 255 Sat 255 Click Ok
Apply your mask from image
Right click on mask layer on layer palette and merge group
Duplicate your mask layer
Pull Elements 7, 50 and 86 into psp
Copy/Paste element 86 as new layer
Move toward the top just a little
Now paste element 50 as new layer and place toward the bottom
Copy/Paste element 7 as new layer and resize to 55%
Place behind house & web Duplicate Image Mirror
Place on left side as shown in my tag above
Set the opacity on ghost layers to 43
Pull these elements into psp
Elements 27,51 and 61
Copy/Paste Element 61 as new layer
Place behind house on left side of image
C/P the tree element as new layer Resize to 75%
Place behind the house
Now c/p element 27 as new layer and resize to 65%
Place behind house but above the tree
Copy/Paste your tube as new layer
Resize to 40% Place on lower right side of canvas
Pull other elements you may like into psp
I used the spider , purple candles and redrose
Resize as necessary if you used the same elements as me
Place the candles at bottom beside your tube
Now place the redrose next to candles
Flip your rose and place over candles
Font set on Sin of the Innocent Size 18 Stroke 3.0 BG #613f88 FG #971d1d
Type out your name Convert to raster
Place where you like
Add your copywrite
Merge all visible and save as png
Pull paper 3 into psp
Copy/Paste as new layer onto image
Adjust Hue & Sat Colorize H 255 Sat 255 Click Ok
Apply your mask from image
Right click on mask layer on layer palette and merge group
Duplicate your mask layer
Pull Elements 7, 50 and 86 into psp
Copy/Paste element 86 as new layer
Move toward the top just a little
Now paste element 50 as new layer and place toward the bottom
Copy/Paste element 7 as new layer and resize to 55%
Place behind house & web Duplicate Image Mirror
Place on left side as shown in my tag above
Set the opacity on ghost layers to 43
Pull these elements into psp
Elements 27,51 and 61
Copy/Paste Element 61 as new layer
Place behind house on left side of image
C/P the tree element as new layer Resize to 75%
Place behind the house
Now c/p element 27 as new layer and resize to 65%
Place behind house but above the tree
Copy/Paste your tube as new layer
Resize to 40% Place on lower right side of canvas
Pull other elements you may like into psp
I used the spider , purple candles and redrose
Resize as necessary if you used the same elements as me
Place the candles at bottom beside your tube
Now place the redrose next to candles
Flip your rose and place over candles
Font set on Sin of the Innocent Size 18 Stroke 3.0 BG #613f88 FG #971d1d
Type out your name Convert to raster
Place where you like
Add your copywrite
Merge all visible and save as png

Subscribe to:
Posts (Atom)
LinkWithin

About Me

Grab My Blinkies


I CT for


Script Tester 4

My Stalker Hits

Blogs I stalk

