


Tuesday, September 25, 2012
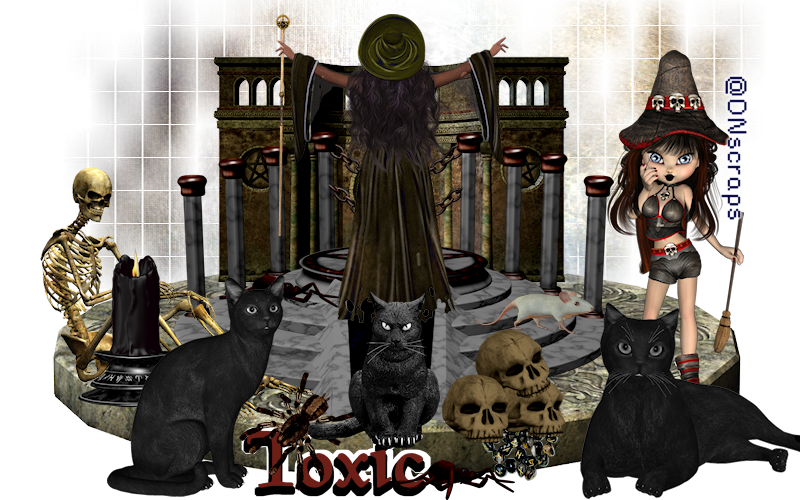
Coven of the Witch
This tutorial is my creation & any resemblemces to others is purely accidental
Written by ToxicTutorialz on 9.25.12 in PSPX2
Any PSP version should work
Do Not Claim as Your own
Link Back to My Blog
Remember to SAVE Often!!!
Written by ToxicTutorialz on 9.25.12 in PSPX2
Any PSP version should work
Do Not Claim as Your own
Link Back to My Blog
Remember to SAVE Often!!!
PTU Kit called Season of the Witch by WitchysHeart
PTU Poser called WitcheryGirl by dnscraps
Font called Magic Medieval download at fontspace.comwww.fontspace.com
PTU Poser called WitcheryGirl by dnscraps
Font called Magic Medieval download at fontspace.comwww.fontspace.com
Open a 800 x 500 blank image
Bring MagicBall into psp
Copy & Paste as new layer and resize to 65%
Place in center of image
Bring Alter into psp and paste as new layer
Resize to 55% and move to bottom
Bring the pentagramstone2 into psp and paste
Resize to 90% Place at bottom below the alter
Bring pentagramwall into psp and paste
Resize to 45% and place behind the alter
On layer palette move the wall layer above the stone layer but below the alter layer
Bring witch3 into psp and paste
Resize to 40% and place on the alter
Bring runes,candle2 and skulls into psp
Copy/Paste the runes as new layer and resize to 20%
Place at bottom of the stone
Repeat for the canle but resize to 35% and place next to runes
Now paste the skulls and resize to 35% place on the stone above the runes
Now paste poser of choice or tube as new layer
Resize if neccessary
Place where you want her
Bring skeleton into psp and paste
Resize to 35% and place on left side on stone
Bring spiders and mouse2 into psp
C&P the mouse and resize all the way down to 15%
Place on altersteps
Repeat for spiders but place 1 on the edge of pentagram stone
and place the other below the stone on transparent image
Bring the blackcats into psp and paste
Resize each one between 35% and 40%
Place them at the bottom around the stone
Apply a mask of choice using paper3
Set your font on MagicMedieval size 20 stroke2
BG on #6d1f17 FG on Null
Type out your name and convert to raster
Place at bottom
Selections Select All Float Defloat Modify Expand by 4 Add New Layer
Floodfill with Black Move this layer below your red layer
Selections Modify Expand by 4 once more Add New Layer Floodfill with white
Move this layer below your black layer but above the red layer
Merge all visible and resize if you like
Save as png

Subscribe to:
Posts (Atom)
LinkWithin

About Me

Grab My Blinkies


I CT for


Script Tester 4

My Stalker Hits

Blogs I stalk

